Here, in this blog, I am going to discuss the importance of Microsoft Office 365 backup. I will also discuss how you backup Office 365 to PST Outlook with the help of manual methods. Also, know are there any professional ways to Export Office 365 Mailboxes to PST.
Contents
How Backups are Beneficial for the Microsoft 365 Users/Tenants?
There are many benefits of the Office 365 backup process. Below I mentioned a few reasons to export Office 365 to PST file format.
- Backing up Office 365 Mailbox to PST format provides security against accidental deletion of cloud data.
- Export Exchange Online emails to Outlook PST format and protect your data from internal threats that come within the organization.
- Keeps the data secure from external threats by downloading O365 data to your hard drive.
- Office 365 Backup lets you provide better support to the customer.
- Frequent updates in cloud technology.
- PST file lets you access your important emails offline even in downtime due to low internet connection.
- It is always recommended by Microsoft to keep a backup of your Office 365 data because of Retention Policy gap.
- Export Microsoft 365 mailbox to PST and save money on when an employee leaves.
- You cannot retrieve permanently deleted cloud data so taking Office 365 Backup to PST is always safe.
- Provides a comprehensive backup solution.
Free Methods to Export PST from Office 365 (Exchange Online)
-
Backup Exchange Online Mailboxes to PST using eDiscovery
The eDiscovery export method is a manual and free method to Backup Exchange Online Mailboxes to PST. In this, you need to use the eDiscovery tool to export the Office 365 mailbox to the Outlook PST file. Follow the given steps to export Office 365 to Outlook PST via the eDiscovery tool. You need to provide the eDiscovery Manager permission.
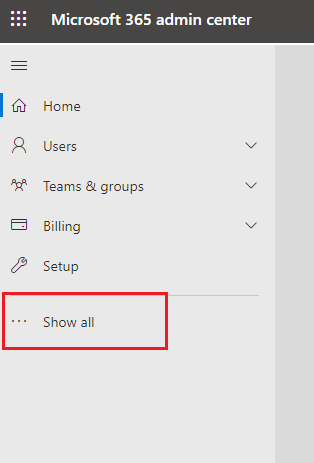
- Open Office 365 and enter into the Exchange Admin Center. In the Admin Center window, Click on show more.
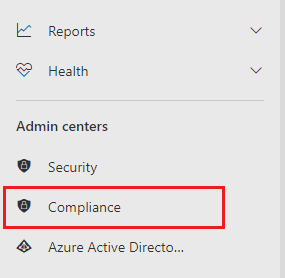
- Click on Compliance.
- A new window will open showing Microsoft Purview. Go to the permissions options and click on Microsoft Purview solutions Roles.

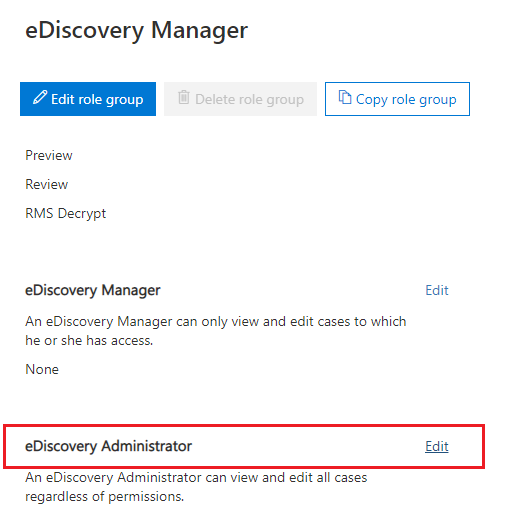
- Double click on eDiscovery manager and click on the Edit role group if Export is not in the Assigned Roles.
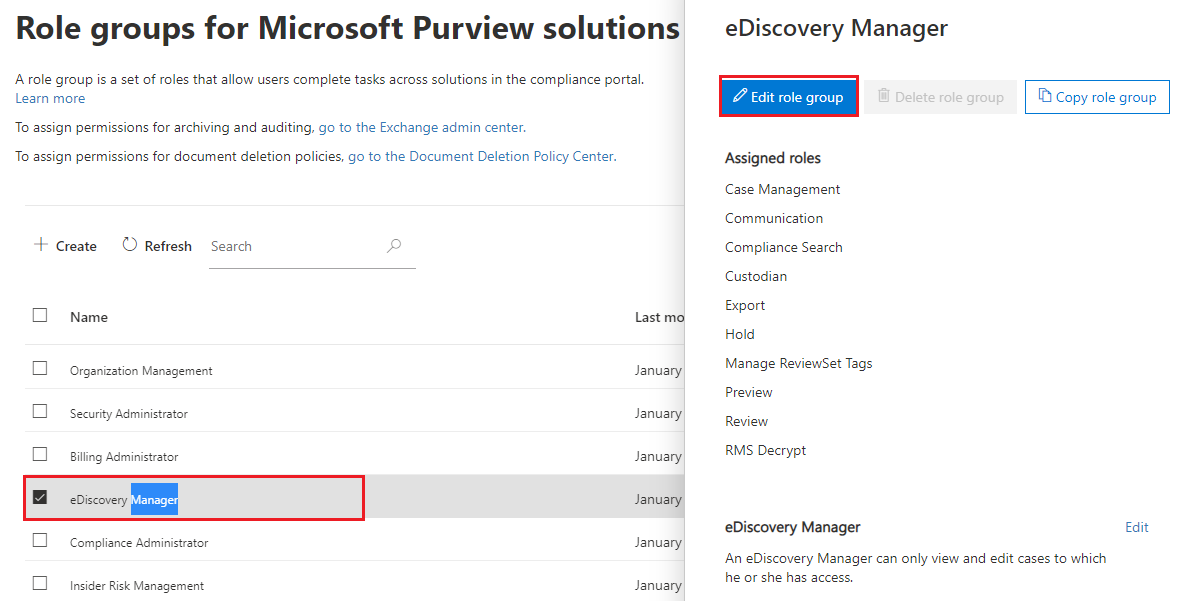
- Scroll Down and click edit next to eDiscovery Administrator. Click on Choose eDiscovery Administrator, Add the member to whom you want to assign a role, and click Save.
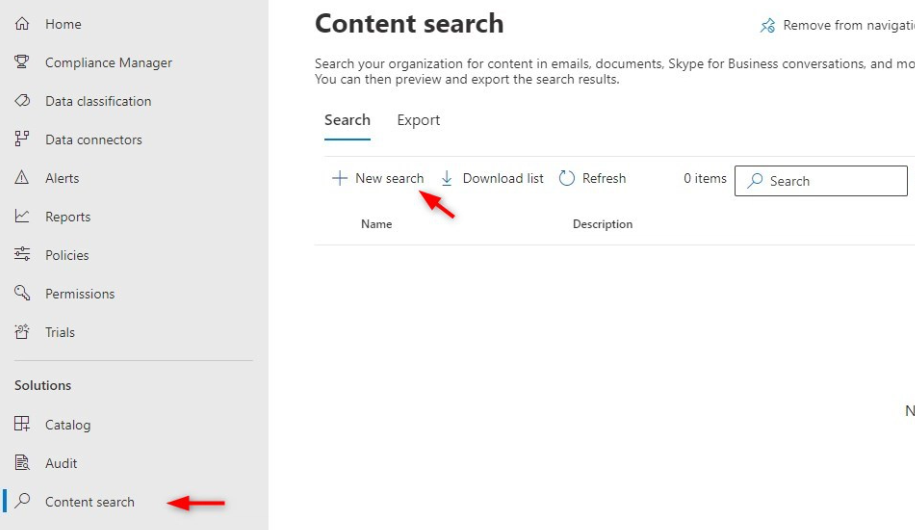
- Now, select content search and click on +New Search.
- Enter the name and description of the new search and hit the Next button.

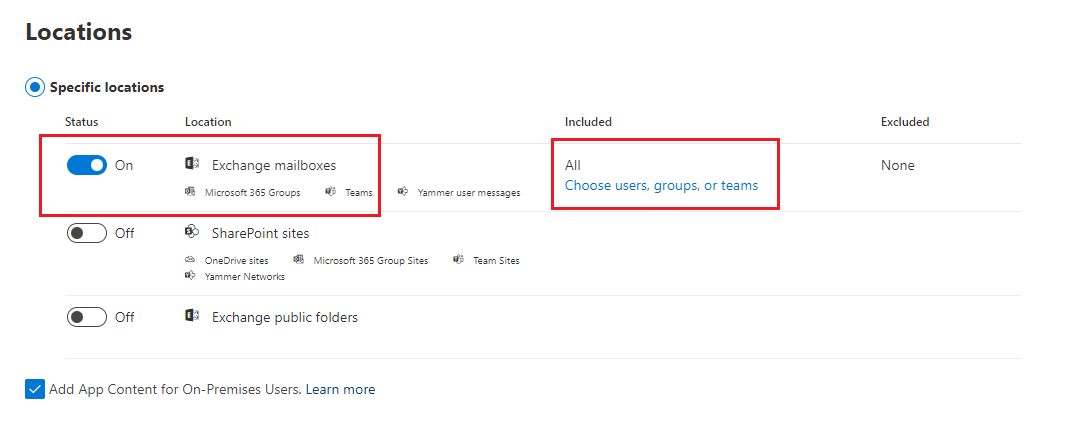
- Change the Exchange mailbox status to ON. Click on the option “Choose users, groups, or team”. Select the mailbox that you want to export and hit on Done button.
- Again, click the Next button and review the content search.
- Click on Submit and then click Done.
- Wait for some time and check that the status of the new content search has changed to complete.

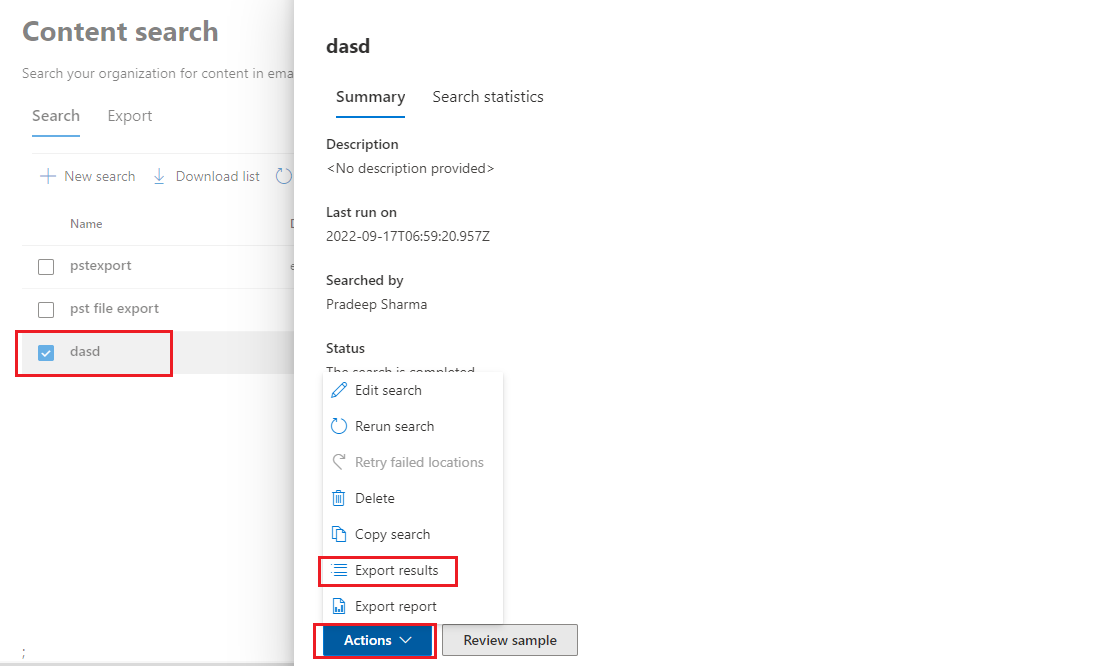
- Now, Double click on the search created by you. Click on Actions and then click on export results.
- Now Select Output options, “Export content as” and click on Export.
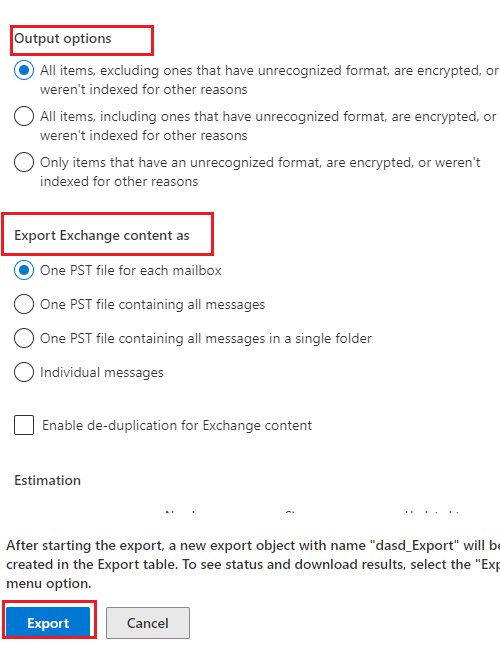
- A window message will open showing “A job has been created”. Click Ok

Note: If you get an error in this step, you should log out, clear browser cache and cookies data then log in again. It will resolve the error.
- Now click on Export Tab, Double click on your content search, Copy your export key and click on Download results.
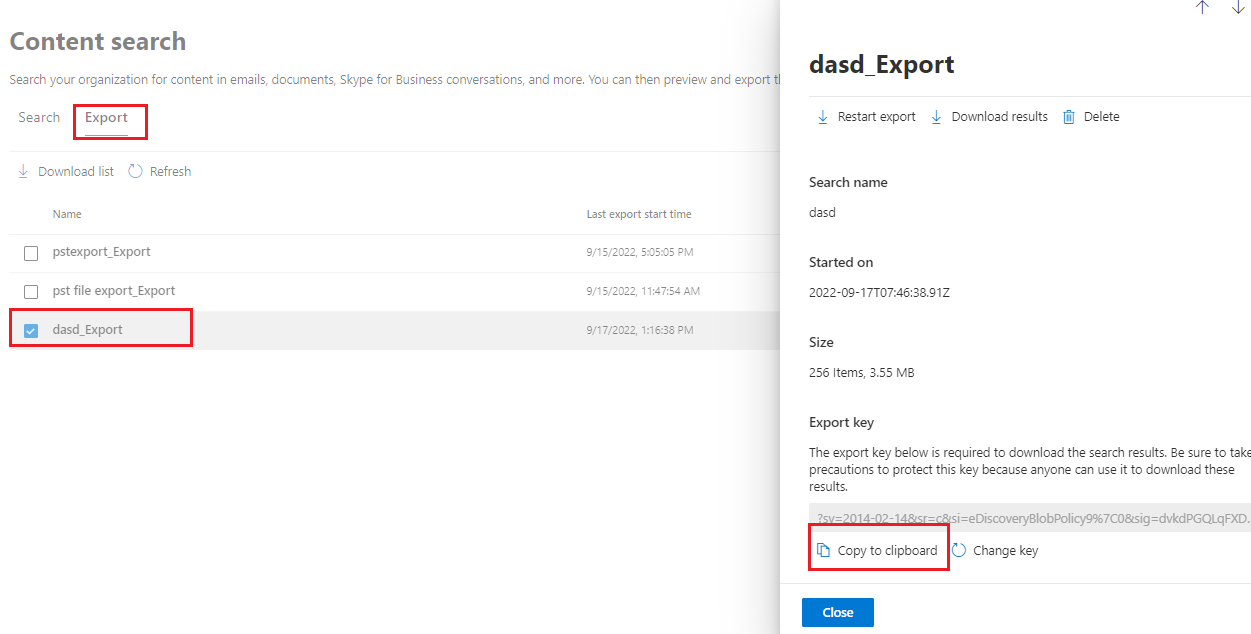
- Click on Open file on the browser.
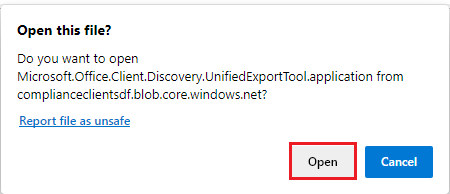
Note: If you are using this first time, after clicking on Open it will ask you to download eDiscovery Export Tool. Install the application.
- An tab will open automatically. Paste your export key and select the location for the backup file.
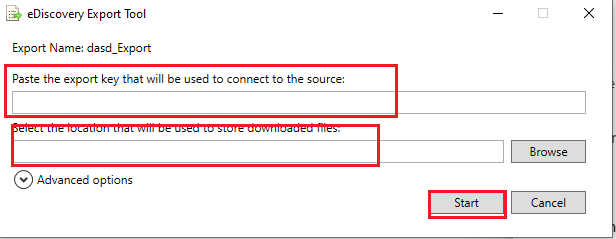
- Now, It will show the estimated time and progress of your export. After the export completion, you can see your backup file at your selected destination.
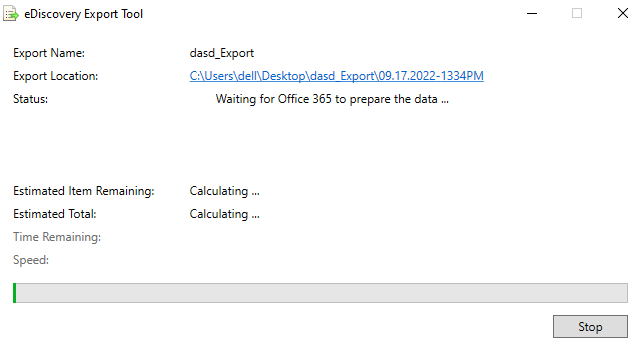
Using these steps, users can Export Office 365 Mailboxes to PST
Limitations of using eDiscovery:
- To use eDiscovery Office 365 backup tool, you need to fulfill all the pre-requisites before starting the Office 365 backup process.
- You can also perform an eDiscovery backup solution in Windows 7 and above. You cannot use it in a lower edition of Windows OS.
- Failed error message while exporting to a large Outlook PST via the export tool.
- Ediscovery crashed error because of a large amount of content searching.
- The eDiscovery tool gets hanged while calculating the process.
- The manual method has lengthy steps that are always confusing and time-tasking.
- To perform a manual way to backup process you need to be technically strong.
-
Export Mailbox from Office 365 to PST via PowerShell Method
PowerShell offers a second manual way to backup O365 to PST Outlook for free. In this method, you need to run some commands in the PowerShell to migrate Office 365 mailbox to Outlook PST format. To use PowerShell, you should have Exchange Server 2010 with Service Pack 1. You also need to check the user permission in the Exchange Admin. . Below are the steps to backup Exchange Online to PST file format using commands.
First, use the New-ComplianceSearch command to perform a search for all Exchange Online mailboxes.
New-ComplianceSearch “your_descriptive_name” -ExchangeLocation all | Start-ComplianceSearch
Now, you need to migrate the data returned by the new search.
New-ComplianceSearchAction “your_descriptive_name” -Export -Format Fxstream
Wait till the tool finishes the migration process, run the Get-ComplianceSearchAction command, and find out the URL required to download the exported data:
Get-ComplianceSearchAction “your_descriptive_name_export” -IncludeCredential | FL
After this, you need to download the URL and the SAS token. Now, use the Start-Process command to look over the entire LocalApps directory for the exact location of the eDiscovery Export tool.
New-MailboxExportRequest -mailbox user1-filepath\\myserver\documentsfolder\name.pst
Limitations of using PowerShell Methods
- You might face a lot of errors while using the PowerShell commands.
- Not every person knows about PowerShell and the commands.
- You have to be technically strong to understand each error to fix it.
-
Configure and Download Microsoft 365 Mailbox using Outlook Import-Export Wizard
You can also export Exchange Online to PST with the help of MS Outlook. It is one of the simplest manual methods to move Office 365 to PST format. Below are the steps to use Outlook Import-Export Wizard to perform Office 365 export PST process.
- Open Microsoft Outlook and click on the New option.
- Enter the profile name and hit on the Next button.
- Select “Manual setup or additional server types” option and hit Next.
- Choose IMAP or POP and enter all the required details.
- Click on More Settings and in the advanced tab add an incoming and outgoing server.
- Go to the File tab of Outlook and click on the Open and Export option.
- Choose the Import/Export option, select Export to a file option and click on Next.
- Now, choose Outlook data file format as .pst and select the folders that you want to migrate.
- Choose the location to save the exported Outlook PST file and click on the Finish button.
Limitations of using Outlook Import-Export Wizard
- You can’t choose to migrate all the mailboxes at once.
- You cannot selectively import the data.
- You cannot select multiple folders at once.
Any Alternative Backup Solutions for Microsoft 365 (Exchange Online) Users?
Yes, there are many third-party solutions available to export Office 365 mailboxes to PST files. These applications are paid but provide more control and features to backup/export Microsoft 365 Online mailboxes to Outlook PST format. Some highly rated third-party Office 365 backup solutions are cloudally, veeam, syscloud, afi.ai, etc. you may check their official websites and compare features as well as prices before making your final decisions.
Wrapping Up:
Here, in this blog, I have mentioned several methods to backup Office 365 Mailbox to PST. You can choose any of the manual methods to extract mailboxes from Office 365 to PST format. You can even use the software to Export Office 365 Mailboxes to PST files.

