Email authentication is essential for maintaining the integrity and security of your organization’s email communications. In Office 365, setting up SPF, DKIM, and DMARC helps to prevent email spoofing, phishing, and ensures that your messages are delivered reliably.
It makes sure if someone gets the email in which from address is your domain, is originally sent from your domain. If not, it marks the message as spoofed. In this blog we will discuss about each technology and the steps to set them up in Office 365.
Contents
Policies for Email authentication in Office 365
Below are all the three policies that helps to identify spoofed, phishing, etc emails. We will see how to setup them one by one.
SPF (Sender Policy Framework)
SPF is an email authentication method designed to detect forging sender addresses during the delivery of the email. It allows domain owners to specify which mail servers are permitted to send email on behalf of their domain.
Setup SPF in Office 365: Email Authentication
- Create an SPF Record: Add a TXT record to your domain’s DNS settings with the value v=spf1 include:spf.protection.outlook.com -all. Also, you need to add if you are using other mail server for sending automated emails.
![]()
- Validate the Record: Use tools like MXToolbox to verify that your SPF record is correctly configured.
Besides SPF, we should also setup DKIM and DMARC to ensure advance level of email protection.
DKIM (DomainKeys Identified Mail)
DKIM adds a digital signature to the email header to verify that the message was not altered during transit. It ensures that the email content remains unchanged and comes from a legitimate source.
Setup DKIM in Office 365: Email Authentication
To setup DKIM signing, your domain should be added in Microsoft 365 and CNAME records are also added in the DNS.
Enable DKIM Signing:
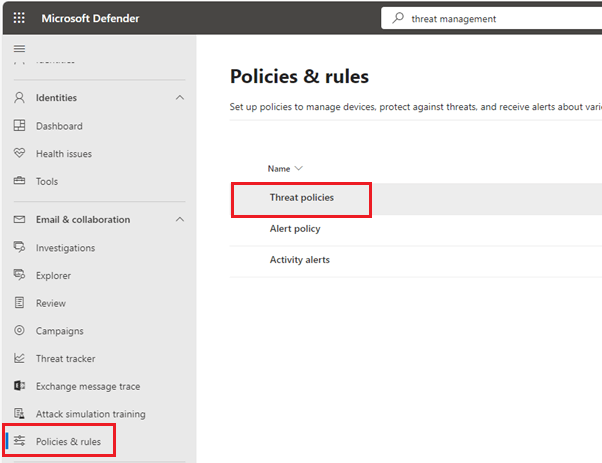
- Go to the Office 365 Security Center and navigate to the “Policies and Rules” section under “Email and Collaboration”. Now choose the Threat Policies.
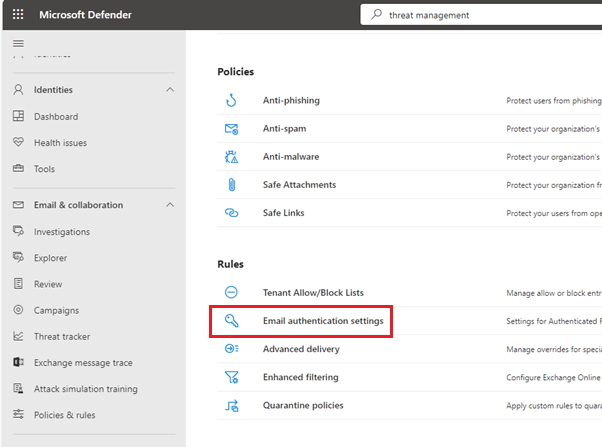
- In threat policies, open Email authentication settings under Rules.
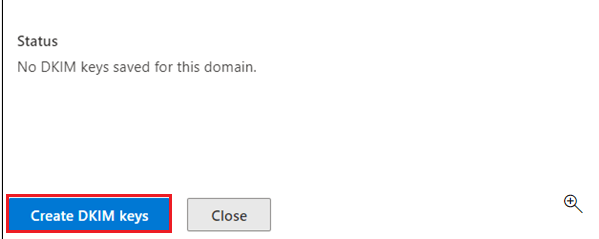
- Now navigate to DKIM and click on Create DKIM keys.
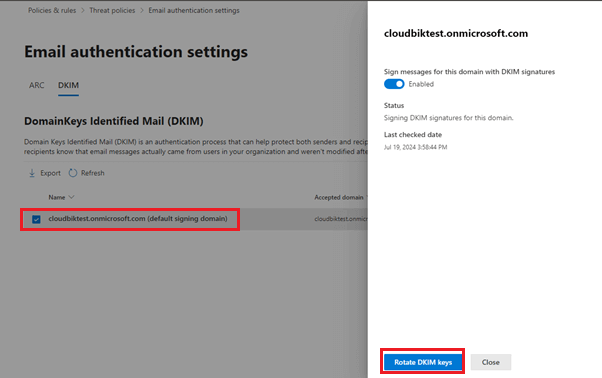
- Now CNAME records will be shown to you, copy those values and add to the DNS records.
- Once added, come back to the DKIM page and enable the DKIM signature option.
DMARC (Domain-based Message Authentication, Reporting & Conformance)
DMARC builds on SPF and DKIM, providing a way to specify how your domain handles failed authentication attempts. It also enables you to receive reports about email authentication activity. DMARC uses the SPF and DKIM to verify the authentication of the emails. A message passes DMARC if either the SPF or DKIM check passes. A message fails DMARC if both the SPF and DKIM checks fail.
Setup DMARC in Office 365: Email Authentication
- Create a DMARC Record: Add a TXT record to your domain’s DNS settings with the value “v=DMARC1; p=none; rua=mailto:[email protected] ruf= [email protected]”. Adjust the policy (p=) as needed (none, quarantine, reject).
- Monitor and Adjust: Start with a “p=none” policy to monitor email traffic. Analyze the reports to understand your email flow and adjust the policy to quarantine or reject for stricter enforcement.
DMARC Policy Explained in Simple Terms
The DMARC policy tells the receiving email system what to do with emails that fail the DMARC check:
p=reject: Emails that fail should be rejected. The exact action depends on the receiving email system, but usually, the emails are discarded.
p=quarantine: Emails that fail should be accepted but marked. The receiving email system decides what to do next. For example, the emails might be sent to the spam folder, the Junk Email folder, or the Inbox with a warning in the subject or message body.
p=none: There is no specific action suggested for emails that fail DMARC. The receiving email system decides what to do based on its own email protection features.
Conclusion
Implementing SPF, DKIM, and DMARC in Office 365 is essential for safeguarding your email communications. These email authentication policies or settings help protect against spoofing and phishing attacks, ensuring that your emails are trusted and secure. By following the steps outlined above, you can enhance your domain’s email security and maintain the integrity of your communications.